Tag: pets

7941098

Arthritis in Dogs and Cats: What Can be Done?

Arthritis, also known as osteoarthritis or degenerative joint disease (DJD), is a degenerative, progressive, and irreversible condition of the joints. It is characterized by the progressive loss of joint cartilage, bony spurs/growths, and the thickening and scarring of connective tissue around the joint, usually as a result of injury.

Approximately 25 percent of dogs are diagnosed with arthritis in their life time, and as many as 60 percent of dogs have radiographic evidence of it.

Degenerative joint disorders are probably as common in cats as in dogs but are less likely to be associated with obvious clinical signs, such as lameness. In one study, 90 percent of cats over 12 years of age had radiographic signs of osteoarthritis.

Arthritis is classified as primary or secondary. Primary arthritis is associated with aging, due to years of wear and tear on the joints. Secondary arthritis is the result of an external event or force (e.g., trauma, poor joint alignment, etc.) that once damaged the joint cartilage.

Arthritis can affect any age, sex, and breed of dog and cat. Most predispositions to it relate to underlying causes, such as elbow dysplasia, hip dysplasia, osteochondrosis, and so forth.

Diagnosis

Diagnosis is based on what is found in the physical examination, X-rays and other diagnostic imaging, joint taps, cytology, force plate gain analysis, therapeutic drug trials, and other tests.

Physical Examination Findings in Dogs

Lameness is the most common sign. It may happen once in a while (episodic) progressive (gets worse over time), or be persistent. Stiffness is common after periods of rest. Stiffness and lameness may decrease when the dog warms up a bit with some activity. Lameness often gets worse after periods of overexertion. Pain, swelling, and decreased range of motion may be seen. Thickened joints, excess fluid in the joint space, and muscle weakening are likely to occur.

Physical Examination Findings in Cats

As opposed to the visible lameness seen commonly in dogs, many cats simply become less active, may hide, or develop behavioral changes, such as irritability, decreased grooming, or difficulty getting into position in the litterbox. Cats also may have joint swelling/thickening, too much fluid in the joint space, and decreased range of motion. There may or may not be pain when the cat’s affected joint is moved by you or your veterinarian.

Diagnostic Imaging

Radiographs (X-rays) and CT scans may show the excess fluid in the joints; the bony spurs; signs of an underlying disorder, such as elbow dysplasia, osteochondritis dissecans, hip dysplasia, or cruciate ligament rupture; and so forth.

Kinetic Tests

Force plate gait analysis in dogs can help find where the lameness is within the joint. It can also show the severity of lameness, both before and after therapy. A force plate is mounted to the floor, and the dog walks over it. Measurements are taken to see which areas use the least force (more affected) and vice versa. The gait analysis hasn’t been used as often in cats.

Therapeutic Trial

In some cases, a therapeutic trial of nonsteroidal anti-inflammatory drugs (NSAIDs) may help confirm the diagnosis if the lameness is less noticeable after taking them.

Treatment, Management, and Prevention

It is not possible to cure arthritis.

The goals are to alleviate your pet’s discomfort, to minimize further degenerative changes to the joint, and to restore the joint’s functionality. Multiple types of treatment are usually necessary to relieve pain, stiffness, and discomfort.

Managing your pet’s weight is important. Excess weight increases stress on the joints and muscles. If your pet is obese, your veterinarian will want your pet to lose weight. Daily, low-impact activities, such as walking and swimming, will not only help your pet with losing some pounds but can also improve joint mobility, muscle mass, and exercise tolerance.

Joint supplements known as chondroprotective agents will help support the cartilage and will have some anti-inflammatory effects. These agents will slow the breakdown of cartilage and/or provide the building blocks that can help build it. Some agents also increase joint fluid secretion and thus decrease inflammation.

The main components of chondroprotective agents are polysulfated glycosaminoglycan (PSGAG), glucosamine, and chondroitin sulfate. Oftentimes there is no improvement using chondroprotective therapies. The failure may be due to too little cartilage left in the affected joint as there’s bone on bone; unresponsive joint inflammation; variable bioavailability of the drug between different products; and the lack of analgesia.

Although the injectable PSGAGs are more expensive, they provide a faster and longer-lasting response than the oral forms. If there is no response after 4-6 weeks, your veterinarian may discontinue use of PSGAGs.

Diets containing omega-3 fatty acids may help reduce inflammation. Some studies have found that dietary supplementation with fish oil omega-3 fatty acids can improve the clinical signs of arthritis in dogs, and may allow the NSAID dose to be reduced.

NSAIDS are an important component of arthritis therapy in dogs. Side effects that you should be aware of include stomach upset, elevated liver enzymes, and potential worsening of chronic kidney disease. Few NSAIDs are licensed for use in cats; your veterinarian will advise you about what NSAID options are available for your cat.

Analgesics such as tramadol, gabapentin, and amantadine may provide pain relief in dogs.

Alternative therapies such as acupuncture, stem cell therapy, platelet-rich or conditioned plasma, physical therapy, rehabilitation therapy (e.g. radial shock wave therapy, pulsed signal therapy), green-lipped mussel supplements, vitamin E, and zoledronic acid may be beneficial in some canine patients. Studies to support their use are still being done.

Surgery 

Your veterinarian may consider surgical options if your pet’s response to medical treatment is low. In addition, your veterinarian may suggest surgery for certain underlying causes of arthritis, such as cranial cruciate ligament rupture, elbow dysplasia, osteochondritis dissecans, joint incongruity, intra-articular fractures, and joint instability. Reconstructive procedures can eliminate joint instability and correct the anatomic defects. If your pet has severe hip dysplasia, your veterinarian may suggest a total hip replacement and femoral head/neck ostectomy. If the arthritis is in the wrist or ankle (then joint fusion may be considered; this surgery is usually well tolerated and can result in reasonable functionality.

Monitoring and Prognosis

Your veterinarian may need to do periodic physical examinations every 1-4 months to monitor your pet’s response to therapy and the progression of the disease. In addition, if your pet is on an NSAID, blood tests including complete blood counts and biochemistry profiles, should be done every few months to ensure there are no side effects impacting the liver or kidneys.

With therapy and careful monitoring, arthritis can be managed in many dogs and cats, resulting in a good quality of life that you and your pet will appreciate. 

7644496

What To Do When Your Dog’s Toenail Trims Don’t Go as Planned

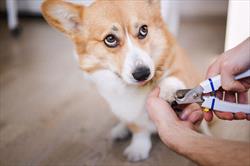
When your dog’s nails get too long, it can affect their health and overall comfort. Overgrown nails are more prone to nail breakage and injury. Over time, too-long nails can keep your dog from placing their feet correctly as they walk or run, and broken nails can get snagged in carpet. 

You’ve watched the staff at your veterinarian’s office trim your dog’s (or cat’s) nails many times. Your well-trained dog has no problem with nail clippers and is always cooperative with the technicians, so how hard can this be?

If you aren’t planning to visit the veterinarian for any other reason, you think, why go in just for a quick nail trim?

So, you have corralled the needed tools for the job, which in your mind are:

     1.  your dog; and
     2.  the nail clippers.

As expected, your always-calm dog sniffs the clippers and holds their paw up for you to begin. Clearly, this is not a big deal. You grasp the paw in your hand and gently expose the first toenail by squeezing a bit. You put the trimmer around the nail and squeeze the handles. With a satisfying click, you see the nail trimming pop away, and at the very same moment, your sweet dog lets out a sharp yelp, frightening you both. And there is blood.

Blood? Why is there blood? That never happens when the veterinarian technician does the nail trimming. 

Your very good dog is still sitting there, looking at you with what you think is betrayed reproach. What now? Panic? No.

Nail Trim Essentials

Let’s back up. 

Let’s return to the last time the veterinary technician trimmed your dog’s nails. This time, really watch the process and ask questions, such as, how short should you trim the nails?

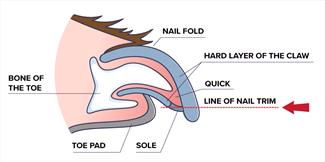
If you aren’t familiar with the term “quick”, it refers to the blood and nerve-filled nail bed. If nails are clipped too short, the quick is nicked, and the nail will bleed. If your dog has fairly clear nails, you can see the quick. If there is an assortment of clear and dark nails, you can judge where the quick might be on the dark ones by looking at a clear nail.

There is a theory that when nails are trimmed or broken, the quick recedes further up the nail. Therefore the“quick line” may not be the same on every nail. If your dog or cat has a nail that seems ragged or shorter than the rest or has a bit of dried blood on it, this nail may have been torn previously. Keep in mind that this nail may not need as much trimming as the longer ones. However, it’s a good idea to clean it up to avoid further tearing.

So, you feel more confident trimming your dog or cat’s nails, right?

Handling “Quicked” Nails:

But now you know that things can happen, and you have revised your list of tools. You gather: 

  1. your dog (or cat);
  2. nail clippers;
  3. clean towel;
  4. a paper plate or small dish; and
  5. a coagulant to help stop any bleeding.

Over-the-counter coagulants to stop nail bleeding are readily available. Styptic powder is the most common substance used for this type of first aid. Made from natural ingredients, including potassium aluminum sulfate (alum) and diatomaceous earth, styptic powder can be used on minor cuts and toenails. It’s safe for use on pets.

You can find styptic powder at any pet supply store. Your veterinarian probably carries it if the clinic sells over-the-counter products. Corn starch will also stop bleeding effectively, and baking powder or flour can be used as a second choice. Keep styptic powder or one of these products on hand with your nail-clipping supplies.

If a toenail does start to bleed, press the clean towel against the nail and hold it firmly for a few moments. Remove the towel and press the bleeding nail into some coagulant powder you’ve already prepared by pouring it onto the paper towel or dish. Use your fingers to pinch some powder to pack into the nail. Continue to hold the towel firmly around the toe.

You could also use a cotton-tipped applicator with styptic powder on the end and hold that firmly to the toenail.

A few minutes of this will likely stop the bleeding, but if it doesn’t, continue the pressure with the towel and reapply the styptic powder.

If your pet isn’t exactly the quiet dog described here, have someone help you by holding your dog or cat. A trusted pet holder can help calm an upset animal and keep the affected foot still, helping to avoid a mess if your pet flings their paw around. Make sure you have trained your pet prior to beginning nail trims. Food distractions may also be helpful.

While uncomfortable for your pet, a toenail trimmed too short and bleeding is not necessarily an emergency. You will become more confident trimming your pet’s nails and less likely to nip the quick the more times you do it. If the bleeding continues for longer than 10 minutes or is very heavy, call your veterinarian.

On rare occasions, your dog may need to be seen by a veterinarian to assess why a nail is bleeding excessively, and sometimes an injured or broken toenail must be removed in order to heal properly.

4536889

Wound Healing in Dogs and Cats

One thing is certain about life: we can all expect to experience some wounds. The good news is that we are fundamentally designed to heal.

While the statement above has philosophical implications, we will stick to the physical ones in this discussion. In particular, we will be considering the skin and the wounds experienced in the skin and underlying tissues.

The skin and its associated tissues exist in layers: the epidermis on the outside (layered in and of itself), the dermis below, the subcutis below that, and fat and muscle below that. When we are injured, these areas may be cleanly cut, punctured, scraped, ulcerated, or burned. 

These wounds can be sterile, unclean (relatively clean but not sterile), or even heavily contaminated. The body is designed to address all of these situations, and often, as caregivers, we can help.

The Healing Process Starts as Soon as the Wound is Inflicted

There are four phases of wound healing: Inflammation, debridement, repair, and maturation.

Inflammation (Starts Immediately)

This is the first phase of healing and is all about controlling bleeding and activating the immune system. Without going into too much biochemical detail, blood clots are forming, and blood vessels are constricting to limit blood loss in the area. This process also calls in “clean up” cells of the immune system to address contaminating bacteria and any dead tissue.

Debridement (Starts in a Few Hours)

Wound fluid, dead tissue, and immunologic cells form pus, which is designed to flow as a liquid from the wound and carry debris with it. The cells that were called to the wound in the inflammation phase are now actively working on consuming dead tissue and cleansing the area.

Repair (Starts in a Couple Of Days)

Collagen begins to fill in the wound to bind the torn tissues, a process that will take several weeks to complete. New blood vessels begin to grow into the area from the uninjured blood vessels nearby. The wound edge begins to produce granulation tissue, the moist pink tissue that will ultimately fill in the wound. The wound will shrink in a process called wound contraction so that new skin can form and cover it.

Maturation (Starts in 2-3 Weeks and can Take Months or Even Years)

Once plenty of collagen has been deposited, the final phase of scarring can form. The scar becomes stronger and stronger over time as new blood vessels and nerves grow in, and the tissue reorganizes. The final result will never be as strong as un-injured tissue but should ultimately achieve approximately 80% of the original strength

Spay Incision

A spay incision is an example of wound healing by primary intention.

Primary Intention

When the wound is a surgical incision with sutures in place, there is no area for the body to fill with granulation tissue. Instead, the wound margins are already held together and the two margins simply need to bond. New skin begins to form across the margin within two days. The four stages of healing continue as above but go much faster (10-14 days total) because there is no gap in the tissue to fill in.

Healing occurs across the wound margin, not down its length, which means long incisions heal just as fast as short ones.

Secondary Intention

If the wound cannot be closed with sutures (it is too big, there is too much tension on the wound margins pulling them apart, the wound is too infected, etc.), then a process called second intention comes into play. This is the part of wound healing where granulation tissue must form to fill in the gap. Once the wound is filling with granulation tissue, contraction soon follows, which means the wound will be getting smaller and smaller. Eventually, it can be allowed to simply close on its own or when it is small enough, the margins can be trimmed and the wound surgically closed with primary intention of a smaller scar and better fur coverage. In the right circumstances, skin grafts can be applied, but only if there is a healthy granulation bed.

We Love Granulation Tissue

It looks like it would be sore. Many people incorrectly feel granulation tissue is not supposed to be there when, in fact, it is a sign of a healthy healing wound. When a wound is cleansed of debris, scabs, or crusts (and often when a bandage is removed), granulation tissue is evident. Many people, especially those not familiar with wound management, find granulation to be disturbing: it is red or bright pink, moist, bleeds easily, and is often confused with underlying muscle.

Granulation tissue:

  1. Should be moist so as to allow better blood flow and a proper debridement phase.
  2. Bleeds easily as it is rich in blood vessels.
  3. Generally is not painful as nerves grow into granulation tissue late in the healing process.

How Can We Help?

The body is actually pretty good at healing, but there are some things that can go wrong, as well as ways that we can facilitate the healing process.

  • Deeper pus pockets must be drained. Eventually, these will probably burst out on their own. Depending on the size of the pus pocket (abscess), a large amount of tissue may slough off when the abscess bursts, so, if possible, the pocket is lanced, flushed, and drained before it gets to that stage. Sometimes, actual latex strips are sewn in place to facilitate pus drainage.
  • The wound must be kept moist. This can be accomplished with bandages and/or ointments. A moist wound has better blood flow and can heal more effectively.
  • Gross contamination should be cleaned up. Dirt, hair, pus, and other bacteria-rich substances should be flushed from the wound. Antibiotics may be needed either orally, topically, or both to address infection.
  • Dead tissue should be trimmed. If there is non-viable tissue in the wound, it should be removed so the body will not have to liquefy it. This can be done through surgery, through certain types of bandages, or by topical applications, depending on the type of wound.
  • Wound-enhancing topical products can be applied. There are a number of topicals touted to reduce infection and/or enhance the formation of granulation tissue. It often seems like new products are available annually, so we won’t review them, but your veterinarian may select one to potentially assist the body’s wound healing efforts.

First Aid Tip: If your pet’s wound is fresh and your pet will allow it, try to wash out large debris particles with tap water (saline flush as used for eyes is even better as it is balanced for tissue exposure). Cover the wound with clean, dry bandage material, if possible. See your veterinarian for professional wound care.

Non-healing Wounds

If a wound seems to be ongoing, either healing and then getting worse again or simply not showing signs of healing, be sure to bring your pet to the veterinarian. Unhealing wounds may have tumor involvement or may simply be infected. Do not try to do it yourself and end up with an advanced and possibly untreatable problem.

7941886

Winter Holiday Hazards for Pets


The holiday season is upon us, and many people plan to include their furry companions in the festivities. As you gear up for the holidays, it is important to try to keep your pet’s eating and exercise habits as close to their normal routine as possible. Also, please be sure to steer pets clear of the following unhealthy treats, toxic plants, and dangerous decorations.

Be Careful with Seasonal Plants and Decorations

  • Oh, Christmas Tree: Securely anchor your Christmas tree so it doesn’t tip and fall, causing possible injury to your pet. This will also prevent the tree water—which may contain fertilizers that can cause stomach upset—from spilling. Stagnant tree water is a breeding ground for bacteria, and your pet could end up with nausea or diarrhea should he imbibe.
  • Avoid Mistletoe & Holly: Holly, when ingested, can cause pets to suffer nausea, vomiting, and diarrhea. Mistletoe can cause gastrointestinal upset and cardiovascular problems. And many varieties of lilies can cause kidney failure in cats if ingested. Opt for just-as-jolly artificial plants made from silk or plastic, or choose a pet-safe bouquet.
  • Tinsel-less Town: Kitties love this sparkly, light-catching “toy” that’s easy to bat around and carry in their mouths. But a nibble can lead to a swallow, which can lead to an obstructed digestive tract, severe vomiting, dehydration, and possible surgery. It’s best to brighten your boughs with something other than tinsel.
  • That Holiday Glow: Don’t leave lighted candles unattended. Pets may burn themselves or cause a fire if they knock candles over. Be sure to use appropriate candle holders, placed on a stable surface. And if you leave the room, put the candle out!
  • Wired Up: Keep wires, batteries, and glass or plastic ornaments out of paws’ reach. A wire can deliver a potentially lethal electrical shock and a punctured battery can cause burns to the mouth and esophagus, while shards of breakable ornaments can damage your pet’s mouth and digestive tract.

Avoid Holiday Food Dangers

  • Skip the Sweets: By now you know not to feed your pets chocolate and anything sweetened with xylitol, but do you know the lengths to which an enterprising pet will go to chomp on something yummy? Make sure to keep your pets away from the table and unattended plates of food, and be sure to secure the lids on garbage cans.
  • Leave the Leftovers: Fatty, spicy, and no-no human foods, as well as bones, should not be fed to your furry friends. Pets can join the festivities in other fun ways that won’t lead to costly medical bills.
  • Careful with Cocktails: If your celebration includes adult holiday beverages, be sure to place your unattended alcoholic drinks where pets cannot get to them. If ingested, your pet could become weak, ill, and may even go into a coma, possibly resulting in death from respiratory failure.
  • Selecting Special Treats: Looking to stuff your pet’s stockings? Stick with chew toys that are basically indestructible, Kongs that can be stuffed with healthy foods, or chew treats that are designed to be safely digestible. Long, stringy things are a feline’s dream, but the most risky toys for cats involve ribbon, yarn, and loose little parts that can get stuck in the intestines, often necessitating surgery. Surprise kitty with a new ball that’s too big to swallow, a stuffed catnip toy, or the interactive cat dancer.

Plan a Pet-Safe Holiday Gathering

  • House Rules: If your animal-loving guests would like to give your pets a little extra attention and exercise while you’re busy tending to the party, ask them to feel free to start a nice play or petting session.
  • Put the Meds Away: Make sure all of your medications are locked behind secure doors, and be sure to tell your guests to keep their meds zipped up and packed away, too.
  • A Room of Their Own: Give your pet his own quiet space to retreat to—complete with fresh water and a place to snuggle. Shy pups and cats might want to hide out under a piece of furniture, in their carrying case, or in a separate room away from the hubbub.
  • New Year’s Noise: As you count down to the new year, please keep in mind that strings of thrown confetti can get lodged in a cat’s intestines if ingested, perhaps necessitating surgery. Noisy poppers can terrify pets and cause possible damage to sensitive ears. And remember that many pets are also scared of fireworks, so be sure to secure them in a safe, escape-proof area as midnight approaches.

4127282

Whipworm Infection in Dogs and Cats

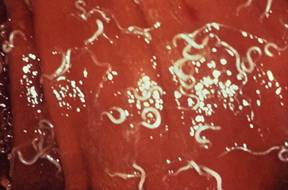
This worm is one of the “big four” intestinal parasites with which our canine friends must often contend: roundworms, tapeworms, hookworms, and whipworms. The whipworm that affects dogs (Trichuris vulpis) is substantially smaller than the other worms (a mere 30-50 mm in length, about two inches maximum) and is rarely seen as it lives in the cecum (the part of the large intestine where the small and large intestine meet). The head (or, more accurately, the digestive end of the worm) is skinny versus its stout tail (or reproductive end), which gives the worm a whip shape, hence the name.

In the host’s digestive tract, food passes from the mouth to the esophagus to the stomach to the small intestine to the large intestine to the rectum, and then to the outside world. This means the large intestine is one of the last stops for nutrients, and by this point in the journey, nutrients have largely been broken down and absorbed. The large intestine is the home of the whipworm. The adult worms bite the tissue of the intestine, actually embedding their heads inside, and suck blood there.

Eggs are laid inside the large intestine and pass with the stool. Once in the outside world, the eggs require about two-to-four weeks to form embryos and become capable of infecting a new host. (This means that contaminated soil is the source of infection, not fresh feces.)

The new host is infected by consuming the egg, usually during grooming. After the host eats it, the egg hatches in the host’s small intestine releasing a larva.

The larva dives into the local glandular tissue and, after about a week, emerges into the small intestine and is carried downstream into the large intestine with the digested food. Once in the cecum or large intestine, its permanent home, it embeds in the tissue there, and after a total of 74 to 87 days from the time the egg was swallowed, the young whipworm is ready to mate.

Signs of Infection

A few whipworms generally do not pose a problem for the host, but if large numbers of worms are embedding themselves in the large intestine tissue, tremendous inflammation can result, leading to bloody, gooey diarrhea. Usually, there is not enough blood loss to be dangerous, but diarrhea readily becomes chronic and hard to control. A second syndrome of infection has emerged but is not well understood: signs mimicking those of Addison’s disease (hypoadrenocorticism). Here, waxing and waning weakness with the inability to conserve salt ultimately creates a dehydration crisis. The syndrome mimics Addison’s disease in every way except that testing for Addison’s disease will be negative and deworming yields a complete recovery.

Because female whipworms only periodically lay eggs (whereas other female worms lay eggs continuously), a fecal sample tested may easily be negative for eggs. This makes confirmation of a whipworm infection a challenge. It is common to deworm whipworms if the symptoms are suggestive of their presence, even if the fecal test is negative. Most common deworming agents do not work on whipworms, so something special must be selected. The most common products are fenbendazole (Panacur®), and febantel (Drontal Plus®).

Thanks to the long maturation cycle of young worms, a second deworming some 75 days or so after the first deworming is needed to fully clear the infection (easy to forget). Often another deworming in between these doses is recommended to further control the whipworm numbers.

Products Effective against Whipworms

More recently, regular heartworm prevention products have been developed to remove and control whipworms: Milbemycin-based heartworm preventives (such as Sentinel®, Interceptor®, and Trifexis®) will cover whipworms, and their regular use covers the second deworming as well. Moxidectin based heartworm preventive, such as Advantage Multi® and similar products, will also cover whipworms. 

Soil contaminated by whipworm eggs is contaminated for years. It is virtually impossible to remove the eggs from the soil or kill them. This potential for environmental contamination is concerning, but while there are scattered reports in the medical literature supporting human infection, the Companion Animal Parasite Council does not consider the canine whipworm to be transmissible to humans until there is stronger evidence.

Feline Whipworm Infection

There are species of whipworms that can infect cats: Trichuris serrata in North America and Trichuris campanula in Europe. Cats are clean animals and fastidious around feces, and they rarely get infected. When they do, worm numbers are so small that symptoms hardly ever occur. Whipworms are more of an interesting incidental finding in cats when whipworm eggs happen to come up on a routine fecal check. In other words, feline whipworm infection is generally not considered to be much of a problem.

team-single-fazenda

Workups for Itchy Dogs and Cats

Pruritus, or itching, in dogs and cats, can involve scratching and licking, chewing, or biting the skin. Pruritus is the most common symptom of skin disease in veterinary medicine. Many conditions can cause pruritus, including allergies, fleas, and other skin parasites. Some skin problems are more common in younger animals, while others are diagnosed more often in older pets. 

Medications are available to manage pruritus, but unless the underlying cause of the pruritus is diagnosed and addressed, it will return once the medication is stopped. Some anti-pruritic medications, such as steroids, can result in other health issues. Providing your dog or cat’s medical history can sometimes help your veterinarian determine the cause of the itching. 

A lack of response to some medications can help your pet’s veterinarian narrow down the possible causes. Additionally, some medications can actually cause itching.

When Did the Pruritus Start?

It can be helpful to know when the itching started. If allergies cause itching, it is beneficial to know if the problem is worse at different times of the year.  

Other Health Problems 

Sometimes, skin conditions develop secondary to another health problem. Your veterinarian will ask questions about other symptoms that could point to a specific cause of pruritus. For example, pets with food allergies may have frequent bowel movements or soft stools.

Location of Skin Lesions

Some pruritic skin conditions cause skin lesions more commonly in one body region than another.

Type of Skin Lesions

Although most pruritic skin conditions look the same to pet owners, there are actually many types of skin lesions, and some skin lesions occur more commonly with specific skin conditions. However, if the pruritus has become chronic, many pruritic skin conditions look similar to each other. Your veterinarian may need to run some tests to help determine the cause of the pruritus.

What Tests are Used to Diagnose the Cause of Pruritus?

Below is a list of some common tests for diagnosing the cause. Your veterinarian will select tests based on your pet’s medical history and examination findings. 

Skin Scrapings

To look for skin parasites, a scalpel blade is used to gently scrape the skin layers to collect cells and any skin mites. The sample is then examined under the microscope.

Skin Cytology

To look for bacteria and yeast organisms, skin cells and debris samples are collected and placed on a glass slide for examination under the microscope. This test can also help determine what types of cells are in the skin.

Parasite Therapy Trial

For some parasites, the only way to determine if they are the cause of the itching is to treat the parasites. A decrease in pruritus after the anti-parasite therapy would be consistent with the parasite causing the pruritus.

Ringworm Testing

To determine if a dog or cat’s skin is infected with ringworm (a disease caused by a fungus called a dermatophyte, not actually a worm), your veterinarian may start by examining your pet under a special ultraviolet lamp called a Wood’s Lamp. If the hairs glow (fluoresce), this may mean your pet has ringworm  Those hairs are collected for further testing. In a fungal culture, hair and skin samples are placed on a fungal culture plate. If a dermatophyte grows, the dog or cat is diagnosed with ringworm. In a dermatophyte PCR test, (a test that looks for viral diseases) the hair and skin samples are checked for dermatophyte DNA. 

Food Trial

A prescription or home-cooked diet is fed for several weeks with no other foods or treats to diagnose food allergies. Unfortunately, there is no reliable skin or blood test in dogs and cats to diagnose food allergies.

Allergy Testing

Skin or blood allergy testing is used in dogs and cats that have had other causes of pruritus ruled out through other tests. It is mainly used to select allergens for a type of allergy treatment called allergen-specific immunotherapy. There are no reliable hair or salivary tests to diagnose allergies.

Skin Biopsy

A sample of skin can be obtained through minor skin surgery. Skin biopsy is especially helpful for diagnosing some less common causes of pruritus, such as skin cancer. However, a skin biopsy cannot be used as an allergy test and cannot diagnose the cause of a pet’s allergies.

7327458

When You Need Antibiotics for Your Pets, and When You Don’t

Antibiotics can be literal life savers for your pet when they have the kind of infection that responds to the medication. However, when given for something where they are not appropriate — such as a virus — antibiotics can create a long-lasting problem of antibiotic resistance, lessening the future ability of antibiotics to cure.

Using antibiotics for viral illnesses such as colds simply doesn’t do anything to get rid of the cold, but it may create drug-resistant bacteria that are much harder to kill because they no longer respond to typical doses of regular antibiotics. Using large doses of less commonly used antibiotics may not treat the problem either or may simply cause more resistance.

Both bacteria and viruses are germs and can make dogs or cats (or people) sick. The two types of germs can cause diseases with similar symptoms, but each one has a different way of multiplying and spreading disease. Diarrhea, for example, can have several different causes, some of which are bacterial, and some are viral.

The difference between the two types of germs is that bacteria are living organisms and viruses are not. Bacteria are only single-cell organisms, but they are still considered alive. Viruses are essentially a collection of molecules that work together to replicate, so they only grow and reproduce after they’ve invaded living cells. Like all other species, their main goal is to replicate. Antibiotics fight living organisms – the bacteria – by killing them or stopping their growth and reproduction, but they can’t do that for viruses.

Your own immune system can successfully fight some viruses, but sometimes, such as after catching a common cold, viruses must simply run their course and there is little anyone can do to shorten the time frame. You can treat symptoms such as coughing and headache, but not the disease itself. Your pets are the same way.

Many diseases veterinarians see are only viral in nature and that’s the point at which you do not want to give your pet antibiotics. Such viruses include:

  1. Distemper
  2. Upper respiratory infection (rhinitis or bronchitis, such as kennel cough)
  3. Viral infections in the eye (keratitis or conjunctivitis)
  4. Parvovirus
  5. Influenza
  6. Rabies
  7. Feline immunodeficiency virus (FIV)

Some bacterial diseases develop after a virus has made it easier for bacteria to infect. Examples include:

  1. Upper respiratory infections
  2. Eye infections
  3. Pneumonia (after, for example, distemper)
  4. Bacterial septicemia (bacteria in the blood) after parvovirus

Many organs can be infected with bacteria. Bacterial infections include:

  1. Ear infections, usually combined with yeast infections
  2. Leptospirosis
  3. Tick-borne infections such as Ehrlichia, Lyme’s disease or bartonellosis
  4. Clostridial diarrhea
  5. Tetanus
  6. Gingivitis or stomatitis
  7. Pyothorax (infection in the chest cavity)
  8. Respiratory infection, including pneumonia
  9. Urinary tract infections in the bladder (cystitis)
  10. Pyelonephritis (kidney infection)
  11. Enteritis or Colitis
  12. Bacterial conjunctivitis
  13. Pyoderma (infection of the skin)
  14. Deep wound infections

Taking antibiotics too often or for the wrong reasons can change bacteria so much that antibiotics don’t work against them. Giving antibiotics when they are not indicated can have two effects that can profoundly impact the health of your patient.

The first is killing healthy bacteria. Not all bacteria are bad, in fact most are probably beneficial. Beneficial bacteria protect from disease-causing bacteria, promote a healthy immune system, and help the body with metabolism. Bacteria in the gut are particularly important, however, bacteria are crucial to the health of many organs.

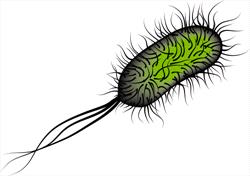
The second effect of antibiotic use is the potential for antibiotic resistance. This means that when a pet has a bacterial infection that could have been treated by antibiotics, the drugs may not be able to help end the infection; your pet will still be sick despite treatment. This can be true if the pet already has received antibiotics, even a different antibiotic.  One example is skin infections.  In some cases, pets can end up with methicillin-resistant Staphylococcus pseudintermedius (MRSP or MRSA). MRSA and MRSP are resistant to numerous drugs and adapt quickly to the immune system, so they are a big concern in the veterinary community. Another common organism that rapidly develops resistance is Escherichia coli, (usually called E. coli), which usually infects the urinary bladder.

Your veterinarian understands these risks and may suggest that antibiotics not be used if alternative treatments might be better. Examples include: 

  1. Mild skin infections (bathing).
  2. Ear infections (cleaning the ears).
  3. Feline bite wound abscesses (opening the wound).
  4. Gingivitis (cleaning the teeth).
  5. Asymptomatic bacteriuria (bacteria in the bladder but your pet does not act like they have an infection).
  6. Most diarrheas (Kaopectate in dogs or cats or bismuth subsalicylate [Pepto-Bismol] in dogs might be better).

Thankfully, you can help your pet avoid antibiotic resistance in several ways:

  1. Let milder illnesses (especially those caused by viruses) run their course.
  2. Take antibiotics for the entire time as prescribed by the veterinarian. Otherwise, the infection may come back stronger than it was, and it will be harder to get rid of than it was in the first place.
  3. Don’t give your pet antibiotics longer than prescribed.
  4. Do not use leftover antibiotics or save extra antibiotics for next time. The reason bacteria are cultured is to find out which antibiotic has the best chance of fighting the specific bacteria.
  5. Don’t give your pet antibiotics that were prescribed for another pet or person.
  6. Use the same caution about antibiotics for pets for everyone in your family. Antibiotic resistance affects people too.
6408132

Weight Loss for Obese Cats

Obesity is a common disease in cats, affecting almost 50% of the patients seen in veterinary clinics across the United States. Just like in humans, excess fat is accumulated in cats due to an imbalance between the number of calories being consumed and the amount of energy being expended during daily activity. Unfortunately, obesity is much more than just a little extra cat to love! Obesity can lead to many secondary problems including diabetes, arthritis, kidney and pancreatic disease, cardiovascular issues, and infections, all of which can ultimately lead to a reduced lifespan for our four-legged friends. 

In fact, weight loss alone has been shown to reduce risk and even reverse some of these conditions in cats, particularly with diabetes. 

Fortunately, obesity is a preventable and treatable disease. Avoiding obesity in our pets can be accomplished by choosing quality food, providing an appropriate amount of food and treats, promoting exercise, monitoring weight changes, and adjusting the amount of food that they receive based on those changes. As with other diseases, prevention is the best approach to ensuring the health of our pets, but sometimes we do not realize just how much weight our cats are gaining between visits to the vet.

The ideal weight for your cat is determined by their body condition score (BCS), which is measured on a 9-point scale that your veterinarian will assign based on your cat’s silhouette as well as the size and location of their fat stores. Using this BCS, veterinarians can establish an ideal weight for each individual cat, which gives us a reference point for weight loss goals and progress. Cats are considered overweight if they weigh 10-20% more than this ideal weight and obese if that number rises to over 20%.

The first step in weight loss is to determine your cat’s ideal body weight based on their BCS. A score of 4-5 is considered an appropriate body condition, so anything greater than 5 is overweight, and anything under 4 is underweight. The general rule is that every 1-point increase or decrease from the ideal BCS score (4-5) is about 10-15% of their weight. For example, if your cat is given a BCS of 6, they need to lose 10-15% of their body weight in order to return to their ideal weight, whereas a cat with a BCS of 9 would have to lose 40-60% of their body weight. With this ideal weight in mind, you and your veterinarian can set a weight loss goal for your cat of losing 0.5-1.5% of their body weight per week. It is important that they do not lose weight too quickly, as we do not want your cat missing out on any essential nutrients that could lead to other problems, like hepatic lipidosis (fatty liver disease). 

Next, you’ll need to assess the current food intake of your furry friend; this includes the type of food they eat, the amount they receive, how often they are fed (2-3 times per day, free feeding, etc.), and the number of treats or extra food they are given. If your cat is being given a lot of treats or has unlimited access to food throughout the day, one of the first things you want to do is start feeding them isolated meals, spreading their total daily food ration over 2-3 meals per day. Eliminating treats and extra food from the table is another quick and easy way to decrease calories. Many veterinarians will recommend switching to a veterinary therapeutic weight loss diet that is specifically formulated to decrease calories while still maintaining all of the nutrients that your cat needs. You may also want to consider trying canned food instead of dry food if your cat will eat it, as canned food typically has a lower calorie content due to the increased water content of the food.

Finally, it’s time to put your plan into action. There is an equation that can be used to calculate the number of calories that your cat should be consuming each day, however, many veterinarians do not rely on this alone as it is based on an average and can vary dramatically between individual cats. Somewhat severe dietary restriction is often necessary to achieve these weight loss goals, so you will typically start by decreasing your cat’s food intake by around 20% and monitor their progress by weighing them every 2-3 weeks. Monitoring their weight is one of the most important parts of this process, as you may need to further decrease the amount of food they are receiving if they are not hitting that goal of losing 0.5-1.5% of their body weight per week. It is best to use a small gram scale to weigh your cat’s food before each meal so you know exactly how much they are getting, as measuring cups and scoops can be inaccurate for measuring kibble.

Measuring your cat’s weight can be done by weighing yourself, holding your cat, weighing again, and then subtracting the difference. This may not be as accurate as your veterinarian’s scale, but will do in a pinch and beats having to get your cat to the vet every week. You can also weigh your cat in the cat carrier, then weigh the carrier alone and subtract the difference.

To help increase your cat’s weight loss and keep that weight from being put back on, you can also try various types of enrichment (toys, wands with toys at the end, food mazes, or outdoor catios) to help your cat become more active and burn more calories each day. Once your cat has returned to their ideal weight, it is important to continue these new lifestyle changes and work to find a feeding plan that allows them to maintain that healthy weight.

Obesity is a common problem that many of our pets face, but fortunately, it is something we can reverse with some simple lifestyle changes. With an appropriate amount of quality food, a consistent feeding schedule, and a little more exercise, there is no reason a healthy cat should not be able to return to that ideal weight. Avoiding obesity can help reduce your cat’s risk of many life-threatening conditions, improving not only the length of their life but also the quality. Although it may be challenging for both you and your cat to adjust to some of these changes, it will certainly be worth it. 

4127599

Xylitol Poisoning in Dogs

Sugar substitutes are big business. Less sugar can mean weight loss, improved health, diabetic control, and even reduced tooth decay. The quest for products that can sweeten and cook like sugar is ongoing. Xylitol (also known as birch sugar) is a common sugar substitute, especially when it comes to sugarless gum, toothpaste, and more recently certain brands of peanut butter for bodybuilders. It is worth noting that even though birch sugar sounds natural and xylitol sounds like a chemical both are toxic to your dog. Not only does xylitol offer sweetness with 40% of the calories of sugar, but it also has antibacterial properties in the mouth so it can reduce periodontal disease and has been found to have far-reaching health benefits in other areas of the body. Xylitol may help with osteoporosis, prevent ear and throat infections, and may reduce the risk of endometriosis, uterine fibroids, and even breast cancer.

Sounds wonderful and maybe it is if you are a human. If you are a dog, xylitol (birch sugar) is potentially lethal. In this video, the FDA says deaths have occurred in as little as one hour.

Two Deadly Effects of Xylitol

Hypoglycemia


In dogs, the pancreas confuses xylitol with real sugar and releases insulin to store the “sugar.” Even worse, the canine pancreas releases 3-7 times the amount of insulin that it would release to address a similar amount of actual sugar. Blood sugar levels plummet resulting in weakness, disorientation, tremors, and potential seizures.

It does not take many sticks of gum to poison a dog, especially a small dog (see below for toxic doses). Symptoms typically begin within 30 minutes and can last for more than 12 hours but, since xylitol can be absorbed into the body slowly, symptoms may not begin until 12 hours after the xylitol was eaten. Symptoms begin with vomiting and then progress to incoordination, collapse, and seizures.

Hepatic Necrosis

The other reaction associated with xylitol in dogs is the destruction of liver tissue. How this happens remains unknown but the doses of xylitol required to produce this effect are much higher than the hypoglycemic doses described above. Signs take longer to show up (typically 8-12 hours) and surprisingly not all dogs who experience hepatic necrosis will have had hypoglycemia first. A lucky dog experiences only temporary illness but alternatively, a complete and acute liver failure can result in death. Internal hemorrhage and the inability of blood to clot are commonly involved.

How Much Xylitol is Dangerous?

The hypoglycemic dose of xylitol for dogs is considered to be approximately 0.075 – 0.1 grams per kilogram of body weight (about 0.03 – 0.045 grams per pound). Chewing gum pieces have surprisingly variable amounts of xylitol depending on their flavor. (For example, most flavors of Orbit gum have about 0.009 grams of xylitol but their strawberry mint flavor has over 0.3 grams per piece). A small dog can easily be poisoned by a single stick of gum depending on the gum, how much the dog ate, and the size of the dog. It is important for you to bring the packaging for the xylitol product in question to the veterinarian’s office so that the amount of xylitol consumed can be estimated.

Treatment

Ideally, the patient can be seen quickly (within 30 minutes) and can be made to vomit the gum or candy. Beyond this, a sugar IV drip is prudent for a good 24 hours. Liver enzyme and blood clotting tests are monitored for two to three days. Blood levels of potassium are ideally monitored as well. Elevated blood phosphorus levels often bode poorly, and patients that develop hepatic necrosis usually do not survive.

What about Cats?

Xylitol toxicity appears to be limited to dogs. Cats have no significant ill-effects from xylitol.

What about Xylitol-Containing Mouthwashes for Pets?

The oral health benefits of xylitol do seem to hold true for dogs if appropriately low doses of xylitol are used.

Several products have been marketed for canine oral care, specifically for dogs that do not tolerate other methods of dental home care. These products are mixed in drinking water to provide antibacterial benefits. Aquadent®, for example, comes in a 500 cc (a half liter) bottle that contains a total of 2.5 grams of xylitol. It also comes in small packets to mix in drinking water. Similarly, Breathalyser Plus® from Ceva is similarly packaged. If you follow the dosing instructions on the bottle or packet, there should be no problems.

Trouble could occur if there are animals of different sizes drinking from the same water bowl or if a dog is on medication or has a disease that causes excessive water consumption.  One should dose for the smallest animal to use the bowl to be sure overdose is not possible. Alternatively, a dental water additive that does not contain any xylitol can be used. Ask your vet what he or she recommends. A dog finding the bottle and chewing it up, drinking a substantial quantity of the undiluted product could easily be poisoned, depending on the dog’s size.

5402994

Rabbit Care Questions and Answers

How do I know if my rabbit is overheating?

Don’t put a heating pad under a small cage in which a rabbit is confined unless directed by a veterinarian for a specific reason. Never leave your rabbit in the car on warm days (anything over 65F) while you run a quick errand.Most importantly, avoid placing your rabbit in a situation where it can overheat. Rabbits can overheat in temperatures 80F or higher, especially if the humidity level is high. Do not leave rabbits outside in high temperatures and high humidity without a cool shelter. Do not leave cages unattended in direct sunlight indoors even in the winter, because glass windows can intensify the heat from the sun. During hot weather if your house is not air-conditioned, place your pet in the coolest area (basement) and use a fan to circulate air. Consider purchasing a room air conditioner for at least one area.

Overheated rabbits will initially become quiet and start panting. They may stretch out and keep their eyes half closed. The ears have large blood vessels near the surface of the skin so they can be used as natural “air conditioners” to release extra heat. The ears in an overheated rabbit will become very warm. The rabbit’s gums and conjunctiva, which is the pinkish tissue under the eyelids, will become dark red and look congested. At this stage it is usually possible to reverse the effects of the overheating by cooling the rabbit.

As overheating progresses, the brain become affected as well as other organ systems and the rabbit starts to go into shock. Signs seen with severe overheating include sudden collapse, complete unresponsiveness, hyperactivity, bizarre behavior or seizures before collapsing or collapse with overexaggerated breathing. When a rabbit collapses he falls to the side, the eyes are usually open and dull looking, and he is not responsive to being touched. The gums and conjunctiva turn muddy brown, eventually to white, as the shock condition deepens. The ears may become cooler because shock causes blood to flow away from the extremities.

The prognosis for an overheated rabbit that has collapsed and is showing signs of severe shock is grave. Rabbits in this condition need immediate veterinary intervention including drugs to combat shock and cool intravenous fluids.

If you suspect your rabbit is overheating, immediately remove your pet to the coolest area you can find. If he is still somewhat alert and is still able to sit upright, take a washcloth soaked in cool tap water (not ice water) and wrap it around both ears to try to cool the blood and thus the body. Do not immediately soak your rabbit with water, as this can be very stressful, but try cooling the ears first.

If the rabbit is not improving after about 5 to 10 minutes of ear cooling, then gently wet the fur with lukewarm water, not ice water. If you use ice water it actually may cause the shock to get worse. If your pet is already collapsed, get him out of the hot area, use a cool cloth on the ears and take your pet to a veterinary office immediately. This is an extreme emergency situation.

Is it bad for my bunny to snack on dog or cat food?

Yes, it is dangerous for a rabbit to snack on dog or cat food. These foods are designed for carnivores, not for herbivores. They are high in protein and fat as well as carbohydrates in the form of grains, usually corn. Although rabbits can eat small amounts of dog or cat food and appear to be normal, there can be insidious changes that take place over time. Excessive levels of protein can lead to kidney damage; excessive levels of fat and grain-based carbohydrates can lead to obesity.

However, by far the most dangerous side effect in rabbits who eat dry dog or cat food is the disturbance of the normal intestinal flora that will ultimately lead to intestinal distress and death. We have seen rabbits become seriously ill and some die within 24 hours of eating dog food due to acute intestinal disorders. Please keep all dog and cat food out of the reach of your rabbit!

When I take my rabbit in for a check-up to the vet, what will the veterinarian expect me to know about my rabbit?

When you take your rabbit to a veterinarian for any reason, it is a good idea to be prepared with the rabbit’s history and with questions you might have. Unless you are dealing with an emergency, take a moment before you leave the house and write down as much of the following general information as you can about your pet (this applies to any pet going to the veterinarian). It can be helpful and increase the efficiency of your visit if you give this information when you first check in at the receptionist’s desk.

  • Date of birth
  • Date and place where you acquired the pet
  • Sex of the pet and whether it is surgically altered
  • Description of the environment (cage size, cage furniture, location in house, etc)
  • Exercise (how often, where)
  • Diet (be specific and include all foods including treats, frequency of feeding)
  • Current medications (including vitamins and “natural” supplements/medications)
  • Other pets in the household

If your pet is experiencing a medical problem, the following information is also helpful:

  1. When the condition first appeared
  2. Detailed description of the abnormality
  3. Medications/treatments already tried or being used now
  4. Records from other veterinarians
  5. Other animals/humans ill in household
  6. Your own thoughts on the cause of this condition

It is also a good idea to have a list of questions you wish to ask during the visit. If they are written down, you won’t forget and you can record the answers on the same page for your permanent records.

I suggest that you keep a medical file at home on your pet with the general information as well as records from your veterinary office and questions and answers you have had along the way. You can easily take this file with you if you need to get a second opinion or are traveling.