Tag: pets

4128821

Fur Mowing in Cats  

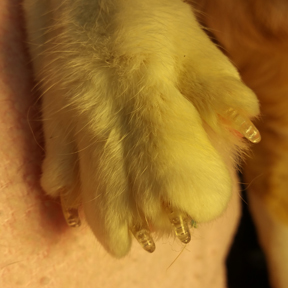
What is fur-mowing? In short, the cat is licking off all his hair. Often the belly is nearly as bald as if it were shaved. Sometimes a Mohawk of normal fur makes a stripe down the back, surrounded by bald spots on either side. Sometimes it is the lower back itself that is bald. Often the owner thinks the hair is falling out. Often the veterinarian wonders if the problem is really psychological. The good news is that most cats that mow do not have mental illness.

The answer is almost always much simpler: cats lick off their hair because they itch and it is important not to launch into treatment with psychoactive drugs until causes of itching have been ruled out. For example, in a recent study of 21 cats referred to the University of Guelph Veterinary Teaching Hospital Behavior Service because of excessive hair licking, only two cats were ultimately believed to have a psychological reason for hair licking, and sixteen cats were found to have a true medical basis for itching, and three cats had both.

But let us go back to the beginning: the cat with a big bald spot.

Read Also: Mealtime Enrichment for Cats

How to Groom a Cat: 12 Steps (with Pictures)

How Do we Know the Cat’s Hair is not Simply Falling Out?

A truly observant owner will actually see the cat licking the area, but cats, being private creatures, often do their licking when no one is watching. One might wonder why it is that the itchy dog creates moist, red, oozy, unpleasant-looking hot spots while the itchy cat cleanly licks away only the hair while leaving the skin itself not in the least bit scabbed, red, or even raw.

This turns out again to be the feline nature: refined. Private and refined. In fact, sometimes the mowing cat will have some hot spots as well or a patch of scabs but often there is only a bald area with normal-looking skin exposed.

The truth is simple: there are only a few rare diseases that actually will lead a cat to lose hair in great patches but, if someone still remains skeptical, there is a test called a trichogram that will confirm the answer. A trichogram involves plucking a hair from the affected area. There are most likely at least a couple of hairs in the area but if there are not, hairs from the margin may do as well. Under the microscope, the end of the hair is flat from having been broken off. A hair shedding from the skin will have a tapered, natural end.

Obvious Reasons to Itch

Before embarking on an extensive battery of tests, it is important to rule out obvious causes of itching. The easiest such cause to rule out is a flea infestation. If live fleas or flea dirt are seen in the coat, then the answer is obvious. If fleas are not seen, you cannot assume there are no fleas to be found, particularly if the lower back is one of the balding areas. 

Cats are efficient groomers and can lick away all traces of fleas, so we may need to go by the pattern of hair loss, (lower back, possibly including scabbing around the neck). hair loss that changes with the seasons and response to flea control. The first step is virtually always going to be ensuring immaculate flea control. After fleas have been removed from the picture, the cat can be reassessed in a couple of months for hair regrowth and/or with a fresh trichogram. If fleas are not obvious right from the beginning, again, they should not be considered ruled out as a cause, but further investigation will be needed. 

The first step is virtually always going to be insuring immaculate flea control. After fleas have been removed from the picture, the cat can be reassessed in a couple of months for hair regrowth and/or with a fresh trichogram. If fleas are not obvious right from the beginning, again, they should not be considered ruled out as a cause but further investigation will be needed.

To properly determine if there are fleas in the household, a flea comb is especially helpful. Flea combs have narrow teeth that can trap live fleas and flea dirt. The cat who is mowing may not have evidence of fleas, but if there are fleas on one of the other pets in the house, you can bet the mowing cat has them too.

Figuring out the Not-So-Obvious Causes

A step-by-step process is important in ruling out hidden allergies, parasites, and even ringworm.

First, the non-invasive tests are performed:

  • Several skin scrapes (ideally, if the cat has Demodex mites, they will be found in skin scrapes, though sometimes this is not the case. Notoedres or Cheyletiella mites generally produce more obvious skin damage.)
  • A fecal flotation test for parasites (occasionally intestinal worms will create itching in the skin. Also, Demodex mites sometimes show up in the fecal test rather than the skin scrape because the cat has been so efficient at licking them up.)
  • Checking the ears with an otoscope (even if the itchy areas are distant from the ears, sometimes ear mites travel out of their normal homes in the ear canal).
  •  Inspection of the cat with a Wood’s light (a fluorescent light – hairs infected with ringworm fungus often glow in the dark) plus a test for ringworm. The culture will require approximately ten days to grow. 

If these non-invasive procedures have not yielded the answer, then there are some choices to make in the approach. Your veterinarian may have a preference as to the order, but the following are several possibilities that might be chosen, each answering different questions.

Skin Biopsy

This can likely be accomplished the same day as the initial visit and yield results as soon as 48 hours later. It is important that the samples be read by a pathologist who specializes in reading skin tissue so your veterinarian may want to request an expert or use a specific laboratory. In this procedure, a local anesthetic is injected into selected areas of skin and an instrument called a punch biopsy (which resembles a tiny cookie cutter) is used to remove small plugs of skin.

The cat will probably have a stitch in each area where a sample was taken.

  1. The absence of abnormalities in the tissue virtually confirms a psychological (the correct term is psychogenic) cause of the mowing. (In the Guelph study mentioned above, three cats had both psychogenic mowing AND medical disease.)
  2. Ringworm can be confirmed more quickly than with the culture (the culture sometimes picks up ringworm when the biopsy does not, though, so doing both tests is very reasonable).
  3. Allergies should be readily identified (though it will not be possible to tell what type of allergy: insect-related, food, or airborne).

Food Allergy Trial

The only way to determine if the cat has a food allergy is to put the cat on a trial diet that the cat could not possibly be allergic to (either a hydrolyzed protein diet or a novel protein diet) for a long period of time and see if the mowing stops. How long? Many cats respond in three to four weeks but some require a good 2 months, so to be sure, a two-month trial is typically recommended.
The advantage of this test is that it can make the correct diagnosis and provide treatment.

  • The advantage of this test is that it not only can make the correct diagnosis but also provides treatment.
  • There are two important disadvantages of this test. The first is that no results will be available for potentially two months. The second is that many cats are picky about the diet food and it may be hard to find one the patient likes. If the cat goes outside, it will not be possible to do a food trial as it will not be possible to control what the cat eats.

See our related page on food allergies for more details.

Flea Control Trial

As mentioned, immaculate flea control is very important in ruling out fleas as a cause of mowing, and it is crucial not to assume that if fleas are not seen, then they must not be involved. There are numerous sophisticated flea products available, and every veterinarian has a favorite. Your veterinarian will instruct you on a schedule for use in this situation it may be more frequent than the manufacturer’s recommendation). The trial should continue for at least 6-8 weeks, after which the cat can be reassessed for hair regrowth or reduction in licking.

  • This trial only answers the question of whether or not the problem is flea-related, and it takes approximately two months to do so.
  • To properly determine if there are fleas in the household, a flea comb should be used, ideally on a pet that is not itchy or mowing. Flea combs have narrow teeth that can trap live fleas and flea dirt.

In an effort to save time, the food trial and flea control trial can be done at the same time. If the cat has not responded after two months, another disease/condition can be pursued. If the cat responds after two months, the cat can be challenged with the original diet. If mowing recurs (which generally takes two weeks at the most on the original diet), then the food allergy is the answer. If the cat continues not mowing after the original food is introduced, then the problem is flea-related.

Demodectic Mange Dipping Trial

Demodectic mange mites can be difficult to find in cats, especially if the cat is over-grooming. It is important to realize that a negative skin scrape does not mean that the cat doesn’t have mites. Fortunately, there is another way to determine if the cat has Demodex mites; the cat can be treated for mites to see if the mowing stops. The cat is treated with lime dip weekly for three weeks. If there is improvement in hair regrowth or a reduction in self-licking, then three more weekly dips are done for a total of six dips, and any other cats in the house are also treated with a total of six dips. Lime sulfur dip is not pleasant. It stains fabric and jewelry and smells like rotten eggs. For these reasons, many cat owners opt for dipping to be done in the hospital rather than at home.

Demodex mange mites are more common in certain geographical areas (such as the Southern U.S.) than others. At which point a dipping trial should be done depends in part on the likelihood of demodicosis being the problem. If Demodex mites are not found on a skin scraping, and they frequently are not even if they are in the skin, then the response to dipping becomes the only way to determine if the cat has them.

Lime sulfur dips are very drying to the skin, and special conditioners may be needed after the third dip if dipping is to continue.

Steroid Trial

For this trial, the patient receives some kind of cortisone-type treatment for three to four weeks. At the end of that time one can tell if the mowing has improved (and the mowing is said to be steroid responsive) it hasn’t improved at all (and the mowing is said to be steroid non-responsive.) Knowing whether or not the mowing is steroid-responsive helps classify possible causes. For example, seasonal steroid-responsive mowing is most likely to be from fleas (technically, allergy to the flea bite) or an airborne allergy. Non-seasonal steroid-responsive mowing is most likely going to be from a food allergy or from demodicosis. Steroid non-responsive mowing is most likely to be from a parasitic or fungal problem or a food allergy.

Many experts like to do the steroid trial at the beginning of the workup while others wait until more results are in.

  1. The use of steroids can make ringworm worse so many experts prefer to hold off steroids until the ringworm culture is finished.
  2. The use of steroids will interfere with a skin biopsy. If a biopsy is being considered, it should be done prior to steroid use.
  3. The use of steroids will interfere with food trials or flea control trials.
  4. The steroid trial is inexpensive and one of the least labor-intensive tests that can be done.

What if the Cat Really has Mental Illness?

This is generally called psychogenic mowing. We don’t imply that we know if cats are licking out of obsession, anxiety, or even boredom. We simply say that there is nothing wrong with the skin. The approach is aimed at environmental enrichment. This means the cat gets more toys, more games (feeding in a different location daily to create a hide-and-seek sort of cat entertainment), and more attention. See more information on environmental enrichment for cats. 

As for anxiety, there are several approaches. Feliway® products employ a pheromone that is naturally made by cats to communicate that a territory is safe and secure. This pheromone is available in a room spray or a plug-in defuser. Alpha-casozepine is a cow’s milk protein with mood-stabilizing properties. It can be given as an oral supplement (Zylkene®) or in a commercial diet (talk to your veterinarian). There are also medications for anxiety: clomipramine, fluoxetine, and even amitriptyline. These can be used to relieve a cat’s need for compulsive over-grooming after more conventional causes of itchy skin have been ruled out.

Overall, fur mowing can be a frustrating condition for which no cause is obvious, and the only solution is to try different treatments and see what happens. Hopefully, this article has provided some meaningful suggestions for testing and treatment approaches.

4128250

Nebulizer Use for Dogs and Cats

Dogs, cats, and other pets who develop lung diseases such as pneumonia, asthma, kennel cough, bronchitis, and so on can benefit from a nebulizer delivering saline, albuterol, antibiotics, or other drugs. A nebulizer is a machine that aerosolizes medicine into a fine mist; it’s like spraying medicine. A face mask is held over the pet’s muzzle (most pets can learn to accept the face mask) so that medication is inhaled deep into the respiratory tract.
 
The esophagus lies above the trachea and is protected by the epiglottis. Pneumonia may result from infections caused by kennel cough, viruses and bacteria. Pets with megaesophagus are prone to developing aspiration pneumonia because they tend to regurgitate food and fluids into the back of the throat and then aspirate the material into the lungs.

A nebulizer can be purchased from human medical supply stores, online, or from eBay. There are several good nebulizer brands, such as Pulmo-Aide, Omron, Devilbiss, etc. Make sure that you obtain the compressor (the machine), tubing, and the medication cup. The tubing, T-piece (a t-shaped tube that attaches the machine to the pet and to an exit) and medicine cup are called a nebulizer kit.

A vaporizer is not the same as a nebulizer. A vaporizer is typically used for sinus or upper respiratory issues rather than lung issues. Vaporized droplets are too big to get as deeply into the lungs the way nebulized particles

You can purchase an appropriately sized mask from a veterinarian, or make one yourself.

Using a Nebulizer

Follow these steps to use a nebulizer.

  1. Plug in the compressor.
  2. Insert one end of the tubing into the compressor and the other end into the cup.
  3. Place the correct dose of the medicine in the medicine cup.
  4. Start the compressor.
    a. Keep the cup up straight and hold the mask up to your pet’s face. You might want to practice placing the mask against the pet’s face before using the nebulizer
  1. b. Put a little canned dog/cat food, baby food, cream cheese or peanut butter inside of the mask and allow the pet to lick it. This can also distract a pet while the treatment is proceeding.
  2. After 5 to 10 minutes, you’ll see and hear that the medicine is running out.
  3. Shake the cup downward a few times to make sure all the medicine has come through.
  4. Take apart the plastic parts of the nebulizer and wash all the parts.

Cleaning the Nebulizer

Bacteria and viruses can live and reproduce in a nebulizer that is not routinely cleaned.

After each use, swish each piece in warm running water. At the end of the day, after you use it the last time, scrub each piece with warm soapy water. Rinse each piece under warm running water. Let each piece air-dry on a clean dish towel or paper towel. When the pieces are completely dry, put the nebulizer back together. If not using for a period of time, store it in a clean, dry bag.

Twice each week, or after the treatment is completed, mix a half cup of white vinegar with 1.5 cups of tap water. Soak each piece in this mixture for one hour. Rinse each piece under warm running water. Let each piece air-dry on a clean dish towel or a paper towel. When the pieces are completely dry, reassemble the nebulizer.

What do I do if I have Cleaned my Nebulizer and the Tubing is still Wet?

The easy way to dry the tubing is to attach it to the compressor. Then switch on the machine, and let it run for a minute or two. The blowing air will dry out the tubing. Use a paper towel or clean hand towel to dry the other parts.

What Medications can be Given with a Nebulizer?

A variety of drugs can be given using a nebulizer: bronchodilators like albuterol (open up the bronchioles allowing debris to more easily be removed from the lungs), steroids, water-soluble antibiotics, saline, N-acetylcysteine, etc. Albuterol opens up the bronchioles, making it easier to breath and allowing antibiotics to get deeper within the lungs. As albuterol can increase the heart rate, it should be used with caution in dogs with heart disease. Do not exceed three treatments per day unless advised by your veterinarian. The dose of albuterol may need to be adjusted based on the size of the dog. Following the albuterol, use the nebulizer with 2–3 cc of sterile saline. Some pets have side effects from albuterol although that is rare. Sometimes side effects are seen, such as nervousness, a rapid heart rate or excessive panting, and they will disappear within an hour or so. If this happens, report it to your veterinarian for a possible adjustment of dosage or change in frequency of treatments.

If your veterinarian has not previously written a prescription for albuterol, for which there is no veterinary version, here is an example of how to write it.

Albuterol 0.083% 2.5 cc vials × 25
sig: using a nebulizer, administer q8–24hr as directed

Albuterol comes in a box of 25 vials, each containing 2.5 cc.

  1. Your veterinarian will prescribe the dose of albuterol for your pet.
  2. Nebulize the computed dose of albuterol; if it is 1 cc or less, mix it with 1 cc of saline solution.
  3. Nebulize an additional 2–3 cc. of saline after the albuterol treatment is completed.

Warning: Albuterol should not be administered to pets by people who have heart or lung disorders. Ask your physician if it is safe for you to be exposed to the albuterol mist given off during nebulization.  

Saline decreases the thickness of mucus and helps moisturize the bronchioles, which helps the pet cough up debris blocking the lungs. Saline solution can be obtained from your veterinarian, or nebulizer saline can be obtained online.

Do not use saline solution intended for contact lenses.

Antibiotics such as gentocin or amikacin, which are intravenous antibiotics, can be mixed with saline. These drugs can be hard on the kidneys, so ideally it is best to monitor kidney function with blood and urine tests. These antibiotics are more kidney friendly when given with a nebulizer than when given intravenously.

Preventing Aspiration Pneumonia

Nebulizer treatments with either saline and/or albuterol can help prevent recurrence of aspiration pneumonia in pets with megaesophagus, pneumonia or bronchitis, and may be helpful in managing laryngeal paralysis by helping to clear aspirated debris from the lungs. Ask your veterinarian if your pet should have a preventive treatment daily, every other day or twice weekly.

4345567

Kennel Cough in Dogs

Kennel cough is an infectious bronchitis of dogs characterized by a harsh, hacking cough that most people describe as sounding like “something stuck in my dog’s throat.” This bronchitis may not last long and be mild enough not to need any treatment, or it may progress to life-threatening pneumonia depending on which infectious agents are involved and the patient’s immunological strength. 

An uncomplicated kennel cough runs a week or two and entails frequent fits of coughing in a patient who otherwise feels active and normal. Uncomplicated cases do not involve fever or listlessness, just lots of coughing.

Numerous organisms (some of which may be prevented by vaccination) may be involved in a case of kennel cough; it would be unusual for only one agent to be involved.

Infections with the following organisms frequently occur concurrently to create a case of kennel cough:

  1. Bordetella bronchiseptica (bacteria)
  2. Parainfluenza virus
  3. Adenovirus type 2
  4. Canine distemper virus
  5. Canine influenza virus
  6. Canine herpesvirus (very young puppies)
  7. Mycoplasma canis (a single-cell organism that is neither virus nor bacterium)
  8. Canine reovirus
  9. Canine respiratory coronavirus.

The classical combination for uncomplicated kennel cough is infection with parainfluenza or adenovirus type 2 in combination with Bordetella bronchiseptica

Infections involving the distemper virus, Mycoplasma species, or canine influenza are more likely to progress to pneumonia, and pneumonia can readily result in any dog or puppy that is sufficiently young, stressed, or debilitated.

Not sure what a Coughing Dog sounds like?

Dogs can make assorted respiratory sounds. Usually, a cough is recognizable but it is important to be aware of another sound called a reverse sneeze. The reverse sneeze is often mistaken for a cough, a choking fit, sneezing, retching, or even for some sort of respiratory distress. The reverse sneeze is a post-nasal drip or tickle in the throat. It is considered normal, especially for small dogs, and only requires attention if it is felt to be “excessive”. The point here is to know a cough when you hear one. A cough can be dry or productive, meaning it is followed by a gag, swallowing motion, and the production of foamy mucus (not to be confused with vomiting). Here are some videos that might help.

Coughing Dog (with Productive Cough): Dixon has kennel cough

Note: We have received a great deal of emails from people who have viewed this video, compared it to what their own dog is doing, and concluded their dog has kennel cough. This video is meant to demonstrate coughing in general. It is important to note that there are many causes of coughing and the nature of the cough does not generally reflect on its cause.

Reverse Sneezing Dog: Maggie reverse sneezes

How Infection Occurs

An infected dog sheds infectious bacteria and/or viruses in respiratory secretions. These secretions become aerosolized and float in the air where they can be inhaled by a healthy dog. Obviously, crowded housing and suboptimal ventilation play important roles in the likelihood of transmission but organisms may also be transmitted on toys, food bowls, or other objects.

The normal respiratory tract has substantial safeguards against invading infectious agents. Probably the most important of these is what is called the mucociliary escalator. This safeguard consists of tiny hair-like structures called cilia that protrude from the cells lining the respiratory tract and extend into a coat of mucus above them.

The cilia beat in a coordinated fashion through the lower and more watery mucus layer called the sol. A thicker mucus layer called the gel floats on top of the sol. Debris, including infectious agents, gets trapped in the sticky gel and the cilia move them upward toward the throat where the collection of debris and mucus may be coughed up and/or swallowed.

The mucociliary escalator is damaged by the following:

  1. shipping stress
  2. crowding stress
  3. heavy dust exposure
  4. cigarette smoke exposure
  5. infectious agents (as listed previously)
  6. cold temperature
  7. poor ventilation.

Without this, a fully functional mucociliary escalator or invading bacteria, especially Bordetella bronchiseptica, the chief agent of kennel cough, may simply march down the airways unimpeded.

Bordetella bronchiseptica organisms have some tricks of their own as well:

  • They can bind directly to cilia, rendering them unable to function within 3 hours of first contact.
  • They secrete substances that disable the immune cells normally responsible for consuming and destroying bacteria.

Because it is common for Bordetella to be accompanied by at least one other infectious agent (such as one of the viruses listed below), kennel cough is a complex of infections rather than infection by one agent.

Classically, dogs get infected when they are kept in a crowded situation with poor air circulation and lots of warm air (i.e., a boarding kennel, vaccination clinic, obedience class, local park, animal shelter, animal hospital waiting room, or grooming parlor). In reality, most causes of coughing that begin acutely in dogs are due to infectious causes and usually represent some form of kennel cough.

The incubation period is 2 to 14 days. Dogs are typically sick for 1 to 2 weeks. Infected dogs shed Bordetella organisms for 1 to 3 months following infection.

How is a Diagnosis Made?

A coughing dog that has a poor appetite, fever, and/or listlessness should be evaluated for pneumonia.

Usually, the history of exposure to a crowd of dogs within the proper time frame, plus typical examination findings (coughing dog that otherwise feels well) is adequate to make the diagnosis. Radiographs show bronchitis and are particularly helpful in determining if there is a complicated pneumonia.

Recently, PCR (polymerase chain reaction) panels have become available in many reference laboratories. Using technology to amplify the presence of DNA in a swab, the lab is able to test for most of the kennel cough infectious agents listed. This knowledge is helpful in guiding therapy and understanding expectations.

How is Kennel Cough Treated?

An uncomplicated case of kennel cough will go away by itself. Cough suppressants can improve patient comfort while the infection is resolving. The dog should be clearly improved, if not recovered, after about a week. That said, several infectious agents in the kennel cough complex are more intense and can cause minor bronchitis to progress to pneumonia, which is a potentially life-threatening disease. Given this possibility, antibiotics are frequently prescribed to kennel cough patients to prevent or curtail pneumonia before it warrants hospitalization.

It is important to distinguish an uncomplicated case of kennel cough from one complicated by pneumonia for obvious reasons. The uncomplicated cases will not have a fever or appetite loss, nor will they be listless. As mentioned, they will seem normal except for coughing. Dogs with pneumonia appear sick.

Prevention through Vaccination

Vaccination is only available for Bordetella bronchiseptica, canine adenovirus type 2, canine parainfluenza virus, canine distemper, and canine influenza. Infections with other members of the kennel cough complex cannot be prevented. Vaccine against adenovirus type 2, parainfluenza, and canine distemper is generally included in the basic puppy series and subsequent boosters (the DHPP or distemper-parvo shot).

For Bordetella bronchiseptica, vaccination can either be given as a separate injection or as a nasal immunization. There is some controversy regarding which method provides a better immunization or if a combination of both formats is best.

Nasal Vaccine

Intranasal vaccination may be given as early as 3 weeks of age and immunity generally lasts 12 to 13 months. The advantage is that local immunity is stimulated right at the site where the natural infection would try to take hold.

It takes four days to generate a solid immune response after intranasal vaccination, so it is best if vaccination is given at least four days prior to the exposure. Some dogs will have some sneezing or nasal discharge in the week following intranasal vaccination; this should clear up on its own. As a general rule, nasal vaccination provides faster immunity than injectable vaccination.

Nasal vaccines for Bordetella generally also include a vaccine against parainfluenza virus and some also include a vaccine against adenovirus type 2.

Oral Vaccine

An oral vaccine is available for Bordetella bronchiseptica (but not adenovirus or parainfluenza). The idea is that it is easier to give the vaccine with a syringe in the mouth – just inside the cheek – and there is no concern about sneezing out some of the vaccine. The oral vaccine can be given to puppies as young as 8 weeks of age. The vaccine is given annually.

Injectable Vaccine

Injectable vaccination is a good choice for aggressive dogs who may bite if their muzzle is approached. For puppies, injectable vaccination provides good systemic immunity as long as two doses are given (approximately one month apart) after age 4 months. Boosters are generally given annually. Some dogs experience a small lump under the skin at the injection site. This should resolve without treatment.

Vaccination is not useful in a dog already incubating kennel cough.

Bordetella bronchiseptica vaccination may not prevent infection. In some cases, vaccination minimizes symptoms of illness but does not entirely prevent infection. This is true whether nasal, oral or injectable vaccine is used.

Dogs that have recovered from Bordetella bronchiseptica are typically immune to reinfection for 6 to 12 months.

What if Kennel Cough doesn’t Improve?

As previously noted, this infection is generally self-limiting. It should be at least improved partially after one week of treatment. If no improvement is seen after that week, a re-check exam (possibly including chest radiographs) would be a good idea. Failure of kennel cough to resolve suggests an underlying condition. Kennel cough can activate a previously asymptomatic collapsing trachea or the condition may have progressed to pneumonia. Alternatively, there may be another disease afoot entirely such as non-infectious bronchitis, congestive heart failure, or some other condition that causes coughing.

If you have questions about a coughing dog, do not hesitate to bring them to your veterinarian.

715962

Jerky Dog Treats from China may be Associated with Kidney Issues

The chicken jerky treats made in China have been associated with kidney disease for a few years. Ever since the association between these products and illness was made in 2007, the U.S. Food and Drug Administration (FDA) has cautioned consumers to not give these treats to their pets.

While the treats are typically referred to as jerky, they may also be labeled tenders or strips.

Signs may occur within hours or days after a dog eats the treat. Signs include decreased appetite; lethargy; vomiting; diarrhea (sometimes bloody); and increased thirst and urination. Contact your veterinarian if the signs last for more than 24 hours, or if they seem severe.

If your dog is vomiting, lethargic, or does not want to eat, and has recently eaten these jerky treats, it does not automatically mean your dog has kidney disease from them.

Test results on affected dogs have shown kidney problems. The kidney problems are often similar to Fanconi disease. (Fanconi disease is an inherited disease in which electrolytes and nutrients are lost in urine.)  Although many affected dogs can be treated and get well, some jerky treat-related deaths have been reported.

In 2007, affected dogs were seen in Australia and the United States. That original outbreak ended in 2009 after all the affected treats had been pulled from the market. However, similar cases have been seen since then in the United States and Canada. Unfortunately, the definitive cause of the problem is still unknown.

The FDA has prepared a “Caution” statement.

In June 2011, the Canadian government sent out notices about the about jerky treats causing Fanconi-like signs in Canadian dogs; in March 2012, the American Veterinary Medical Association sent out a new alert about Canadian cases. In May 2012, the FDA updated their public information on their concerns about chicken jerky.

The FDA continues to investigate complaints and test products eaten by affected dogs. No specific brands have been recalled as of this time because there are only complaints, not evidence. However, there are a number of dogs with some level of kidney illness who have eaten the China-produced chicken jerky treats, so pet owners should be cautious about giving those.

Anecdotal reports from veterinarians indicate similar concerns about sweet potato pet treats made in China. Although no evidence is available that these sweet potato treats cause kidney issues similar to those related to chicken jerky treats, pet owners should be aware of the possibility.

If your pet has the signs listed above, and has eaten chicken jerky or sweet potato treats made in China, contact your veterinarian. Save the treats and packaging so that they can be tested by the FDA if they are suspected to cause the illness.

2950827

Epulis Tumor in Dogs’ Mouths

Epulides/epuli (plural of epulis) are common benign growths found in dogs’ mouths.

There are three types:

Fibromatous epulis appears on a stalk of tissue, much like a mushroom, or as an unmoving mass. It is usually pink in color and has a non-ulcerated smooth surface. It may appear as an enlargement on the gum tissue near incisor, canine, or premolar teeth.

Peripheral odontogenic fibroma (previously called ossifying epulides) is similar in appearance to a fibromatous epulis as it also has a pink smooth surface, but it has an osteoid matrix; it’s made up of early-stage bone cells known as osteoblasts.

Acanthomatous ameloblastoma (previously called acanthomatous epulis) is classified as benign but it tends to invade adjacent bone and it is locally aggressive. It can be pre-cancerous. However, it does not spread to other regions of the body. This tumor often has a rough cauliflower-like, ulcerated surface. It occurs most commonly in the incisor and canine tooth area of the lower and upper jaw. It occurs less commonly near the fourth upper premolar in the upper jaw and the lower jaw’s first molar.

Statistics

Epulis is the fourth most common tumor found in the canine mouth. It is very rare in cats.

This tumor is more common in brachycephalic breeds. Brachycephalic breeds are those that have a very short nose and muzzle. Boxers and English Bulldogs are brachycephalic dog breeds, for example.

Middle-aged and older dogs get epulides more often than young dogs do. The average age of an affected dog is seven years old.

The overgrowths are generally a reaction to trauma, such as a tooth rubbing on the gum in brachycephalic mouths, for example.

Clinical Signs

Signs include a lump on the gums, drooling, halitosis, facial deformity, and other signs of mouth injury. The visible lump is the most common sign.

Diagnosis

Diagnosis begins with a visual examination of the mouth.

Radiographs of the head can determine how invasive the tumor is.

Biopsy and histopathological (microscopic) examination of the lump will determine which type of epulis is present.

Treatment

Fibromatous epulis: Treatment involves removing the mass, extracting the involved tooth, and thoroughly scraping the tooth socket clean.

Peripheral odontogenic fibroma: Treatment involves removing the mass, extracting the involved tooth, and thoroughly scraping the tooth socket clean. This surgery can be more difficult than that for fibromatous epulis.

Acanthomatous ameloblastoma: Treatment is surgical removal, including removing the affected areas of the upper or lower jaw (maxillectomy or mandibulectomy).

In some inoperable epulis cases, radiation therapy may help.

Aftercare

After surgery, your pet may need a softer diet. Your veterinarian will advise you about this.

Prognosis

The less tissue involved, the better. If a large section of the jaw has to be removed, it can affect the dog’s quality of life.

The oral tumors don’t usually recur if the entire tumor has been removed. However, some can. Checking your dog’s mouth frequently will help you spot any tumor recurrence or new tumors.

4128333

Esophagostomy Tube (E-tube) Care

Many people are intimidated by the idea of feeding a pet through an artificial tube, but the fact is the esophagostomy, or E-tube, makes feeding the sickly pet easy and free of mess. If you have been dealing with oral syringe feeding, meatball feeding, or even nasal tubes, the E-tube should be a breeze. Feeding through the tube is comfortable for the pet, plus the tube in no way precludes natural eating should the pet wish to do so. As your pet begins to feel better, regular eating can readily take place without disturbing the E tube.

The E tube can be in place as a temporary support measure or can be used long-term as an indefinite support measure. As you get used to using the tube, feeding will come to be a simple process and part of your regular pet routine.

To Feed your Pet

Have everything ready before beginning. You will need:

  • A syringe full of the liquid food in the appropriate amount. The diet should be warmed but not hot. Do not microwave the diet, or you may get hot spots that are too hot. To warm the food, microwave a tall glass of water and insert the syringe of food in the warm water and let it sit until the food is at least room temperature, and ideally close to body temperature.
  • A small glass or cup of tepid (lukewarm) water.
  • Any medication you should be giving at this time.

Clear the tube by squirting 6 ccs of tepid water through it to be sure it is not clogged. Next, hook up the food syringe and slowly deliver the food to the patient. It is tempting to just blast it all in there but for patient comfort, try to take several minutes or so and take your time. Follow the food with a chaser of 6 ccs of tepid water to clear the tube. Liquid medicine can be given through the tube as long as the tube is cleared with 6ccs of tepid water before and after each time. Do not put pills in the tube as it could clog. Pills can be crushed and given through the tube only if they are well dissolved in liquid. Any caking of pill powder has the potential to clog the tube, so be sure to flush the tube with tepid water after use.

You will need to clean the stoma (the opening of the skin where the tube enters) daily with a baby wipe or moist tissue, otherwise discharge and/or crusting will accumulate there. Periodically the wraps will need changing. A special type of collar may be helpful in keeping the tube neat and comfortable.

Be sure to allow time for digestion between feedings. How much time depends on your pet’s feeding plan.
Be sure you understand the amount for each feeding and the feeding schedule provided by your veterinarian.

Having Problems?

Vomiting?

  • Are you giving the food too quickly? Rapid distension of the stomach is a stimulus to vomit. Try going slower.
  • Is the food too cold? Try warming the food to body temperature (around 100°F). Use a thermometer in the warming water bath to be sure the temperature is where you want it.
  • If these two solutions do not work, the tube may have slipped too low inside the esophagus. If the tube is dipping into the stomach, the patient may vomit. The doctor can take an x-ray to see if this is the case and then easily reposition the tube. If none of these things seem to be happening, the patient’s primary disease may be progressing. Your veterinarian will need to evaluate your pet more comprehensively.

Tube clogged?

A clogged tube can be a challenge. First, try to force 6 ccs or so of tepid water through the tube by pushing. If the clog does not give way, try hooking up a syringe of 6 ccs or so of water and alternately push and pull back, creating a “toilet plunger” effect. Continue fairly rapid push-pull action until the tube is cleared.

Note: some people feel that incubating 6 ccs of cola soda in the tube overnight is helpful in dissolving a clog. Whether or not this works is somewhat controversial, but it may be worth a try, as the tube will be useless if it cannot be unclogged.

Crusting or pus at the tube exit site?

The patient’s body does not like having a foreign body sticking out of it and frequently there is some inflammation at the exit hole. True infection is unusual, and most of the time simply cleaning the area with gauze or a moist tissue is sufficient to solve the problem.

Esophagostomy tubes can stay in place for months without needing to be replaced. Hopefully your pet’s condition will have resolved before that time. When the time comes, the tube’s anchoring sutures can be snipped and the tube pulled out. The hole left behind will simply heal on its own. If you have any questions about the tube or its care, your veterinarian will be happy to assist you.

6726721

Enrichment for Senior Dogs

What is Enrichment and Why is it Important for Senior Dogs?

Enrichment is offering experiences and opportunities to animals to encourage healthy natural behaviors and enhance physical and emotional welfare. Enrichment is often broken into two broad categories: environmental and social.  Environmental enrichment alters the animal’s space either by making changes to the environment itself or by adding novel items such as toys, feeding puzzles, exercise, and things to smell and explore. Social enrichment involves offering positive social experiences for the animal with people or other animals.

Enrichment is important for all species of animals, including people! Sometimes we enrich our lives and our animal’s life without even noticing, such as going for walks outside or eating a yummy treat. Sometimes enrichment takes planning, such as a vacation or assembling food puzzles for your dog. Understand that what is considered enrichment should be from your dog’s perspective and each dog needs to be able to choose if they want to participate or interact with the enrichment item or not. We can entice dogs to participate by offering their favorite treats or petting in their favorite spots but ultimately it will still be their choice to interact or not.

Dogs can have several age-related diseases that can result in behavior changes and welfare concerns, such as arthritis, dental disease, cancer, diabetes, and other endocrine diseases. Additionally, dogs can develop canine cognitive dysfunction, a syndrome that is similar to Alzheimer’s disease in humans.  Pain is more likely to occur in senior dogs with age-related diseases, leading to decreased activity, increased anxiety, restlessness, and occasionally aggression. Due to these age-related challenges, we should find ways to enrich their lives and help manage these conditions. While senior dogs may not be able to participate in much physical enrichment, such as long walks, other forms can be mentally stimulating and tiring.

If you have noticed behavioral changes in your senior dog, work with your veterinarian to determine if there is an underlying medical condition that may be causing the behavior. You should also discuss your dog’s weight and nutrition with your veterinarian to keep them at a healthy weight and as comfortable as possible.

By working with your veterinarian to manage age-related health conditions and providing individual and age-appropriate enrichment, you can enhance your pet’s quality of life and improve your bond with your aging dog.

This 13-year old dog is eating her breakfast from a small box filled with kibble.
Photo by VIN.

Enrichment Ideas for Senior Dogs

Shorter walks outside  There is nothing like the great outdoors! Physical exercise, opportunities for social interaction, and new things to see and smell! Your walks may need to be a lot shorter than they were in younger years, but they are still beneficial. Just make sure to monitor how your pet is handling the walk and not to push your dog too far. Even sitting outside or taking a short walk focused on sniffing (sniff walk) can be enriching.

  1. Puzzle Feeders – There are many different puzzle feeders available for dogs. You can shop online, in pet stores, or make them yourself! You can use some or all of your pet’s regular diet in the puzzle feeders, and you can also use special treats. For a simple DIY puzzle feeder, put some kibble in a plastic bottle without the lid, or save toilet paper or paper towel tubes and put kibble inside with the ends folded. Just make sure your dog doesn’t try to eat the bottle or cardboard! Another simple idea is to feed your dog from a muffin tin; you can even put tennis balls on top of the muffin tin to make it more challenging. Sometimes, you can freeze food in puzzle feeders to make them last longer.
  2. Snuffle Mats – Snuffle mats look like extra shaggy rugs. You can purchase them or you can make them yourself. They can be used as a food puzzle or you can use them with scents. If you are adding scent, make sure that it is safe for dogs. Certain essential oils such as cinnamon, tea tree, peppermint, and wintergreen are not safe. Scents such as coconut, vanilla, ginger, and valerian are safe. Additionally, some dogs respond to catnip, and it can help them relax. Snuffle mats encourage sniffing and encourage normal foraging behaviors.
  3. Scavenger Hunts – Hide treats, food items, and toys around the house or yard. Some dogs enjoy playing hide and seek with their favorite toys. Hide items in safe places. Hide items near places the dog frequents, such as by their bed or water bowl, and then expand from there.  
  4. Positive Reinforcement Training  An old dog absolutely can learn new tricks! Positive reinforcement training will improve your bond with your pet at any life stage, and senior dogs are no exception. Positive reinforcement is rewarding your dog, usually with a food treat, for doing what you ask. Clicker training is a great way to use positive reinforcement to train your dog. You can teach useful behaviors such as sit, lay down, crate, and stay, or you can teach fun behaviors to your dog such as shake, target, speak, fetch. Positive reinforcement training is a great tool for senior dogs because it is mentally stimulating but does not require physical exertion.
  5. Socialize with other Senior Dogs or Calm dogs – If your dog enjoys the company of other dogs, arrange for play dates with other calm or senior dogs. Make sure that your dog enjoys this experience by monitoring their body language. Your dog should choose to engage with the other dogs, have loose body language, and be relaxed.
5077733

Declawing and Alternatives for Cats

Declawing (also known as onychiectomy) has probably become the most controversial of all the elective surgical procedures commonly performed by veterinarians. While it is normal for cats to scratch things (to mark territory as well as to condition their claws) this behavior can destroy the bond between an owner and pet cat. Cats, especially adolescent cats, tend to play rough, scratching their owners or other pets sometimes violently in play. Claws serve to mark territory and assist in communicating territorial messages to other cats though this behavior can be undesirable when it is directed against furniture. 

The declaw surgery is an instant permanent solution to these problems; however, it is popularly held that a number of adverse conditions result from declawing, possibly including chronic pain for the cat. Pet owners need an understanding all of the alternative options involved as well as what the actual facts are regarding this procedure. 

The American Veterinary Medical Association policy regarding declawing is: The AVMA discourages the declawing (onychectomy) of cats as an elective procedure and supports non-surgical alternatives to the procedure. The AVMA respects the veterinarian’s right to use professional judgment when deciding how to best protect their individual patients’ health and welfare. Therefore, it is incumbent upon the veterinarian to counsel the owner about the natural scratching behavior of cats, the alternatives to surgery, as well as the details of the procedure itself and subsequent potential complications. Onychectomy is a surgical amputation and if performed, multi-modal perioperative pain management must be utilized.

Alternatives to Declaw Surgery to Try First

Scratching is a natural behavior of cats, which makes it difficult to modify. The usual goal is to transfer the cat’s scratching instinct to a scratching post or other scratching toy; it is virtually impossible to control the desire to scratch completely. Some cats take quickly to alternative scratching surfaces while other cats require time-consuming training. 

Training tips include:

  • Cats seem to prefer to scratch upholstery with a vertical drag to the fabric. Furniture can be upholstered in an unacceptable fabric and a scratching post can be swathed in an appropriate fabric (rather than the usual carpet).
  • Furniture can be made unacceptable by using plastic, double stick tape or aluminum foil to cover the target pieces.  Spray-on antiperspirants can be used on the furniture as a repellent.
  • Treats or catnip can be used to attract the cat to the scratching post.
  • The cat can be punished for furniture scratching attempts but it is important that the cat cannot connect the punishment with the person administering it (otherwise the cat will simply learn not to scratch while that person is watching). Yelling, spanking, or shaking a can with pennies in it is too directly associated with the person rather than the act of scratching. A water squirt bottle is better but only if the cat does not see where the squirt comes from. Booby traps can be set up using balloons. If mouse traps are used, it is vital that they be turned upside-down so that the cat cannot possibly catch a foot in the trap. Stacked traps can be set up so that they pop upward when tripped, making a surprising noise. In this way, punishment can still be carried out when the owner is not at home. The idea is to convince the cat that the furniture piece is not a good area for scratching and that the appropriate scratch toy can be used with no adverse experience.

Many owners are not excited about putting mousetraps up against their living room furniture, upholstering in aluminum foil, or decorating sofas and chairs with balloons. It is easy to see why a surgical solution would be attractive. Fortunately, there are more options.

Nail Trimming

For some cats, simply keeping the nails short is adequate control but many people do not know how to trim their cat’s nails. In fact, the non-pigmented nail of a cat makes it easy to see where not to cut. This video on YouTube shows exactly what to do. 

Blunt Acrylic Nail Caps

This is another popular method of controlling a scratching problem. Blunt acrylic nail caps are glued onto the cat’s claws. The idea is that the blunt nail will not be sharp enough to cause damage. The veterinary staff will place the first set but typically after that the owner has the option of placing the caps at home.

What to Expect 

  • The nail caps will wear off but not at the same time. After a couple of weeks some of the nails will be capped and others will not be.
  • The nail caps must be replaced as the nail grows out.
  • Some cats are not in the least discouraged from scratching by these caps and are able to simply scratch larger holes in the upholstery.

Surgical Declaw (Onychiectomy)

Despite our best efforts to deflect scratching or decrease claw sharpness, sometimes nothing works and an immediate, permanent solution is needed. It is important to consider that the declaw surgery alters the cat permanently and should not be done if alternative methods are effective. The cat will need some special care during the post-operative healing period: special litter, pain medication, and some activity restriction as he/she will have tender feet for a week or two after surgery. The declawed cat should be forever indoors or outdoors only with supervision as they will no longer have the ability to defend themselves against dogs or other cats.

There is a great deal of controversy regarding this procedure and it has been legally restricted in many areas. Few veterinary surgeries encounter as much bias as the declaw, and a political has movement emerged. Some concerns are valid and some less so. Before making a declaw decision, it is important to review the arguments and find your own perspective. Here are some of the issues.

  • The declaw is viewed by many as performing an unethical surgical alteration of a companion animal for the sake of convenience. This is frequently countered by the idea that convenience is not the issue but that the relationship between the pet and its owner is at stake. If that relationship fails, a much bigger life quality issue is at stake including relinquishing the cat to the shelter where euthanasia is a real possibility.
  • Chronic pain may result from alterations in the foot anatomy and that long-term arthritis is promoted. While there may be truth to this, it is important to realize that 90% of cats over age 10 have arthritis in at least one joint. While it is certainly better to prevent arthritis in a cat’s senior years if we can, we still need the cat to get to its senior years. Arthritis can be treated; euthanasia cannot.
  • Some people believe that a cat’s indoor only lifestyle is not humane because it is not natural, or an indoor only lifestyle may be impractical because of other people or other animals coming and going in the home. It is true that a declawed cat should become an indoor only pet for its own protection.
  • There is belief that the procedure is performed too casually and that alternatives are not properly given consideration. Regardless of one’s feelings are on whether to declaw a cat, the fact remains that we are talking about a permanent alteration with a potential for negative ramifications later on. This procedure is not to be done lightly and it is important to at least attempt some of the alternatives discussed above.

Research has been conducted to sort out truth from political propaganda. The AVMA has an excellent source where this research has been collated and the concerns are addressed. Here are some conclusions but feel free to examine the AVMA’s information on your own. 

Myth #1:  After declawing, a cat is likely to become fearful or experience behavior changes, impairing an affectionate relationship with his owner.

Numerous scientific studies have been unable to document any behavior changes post-declaw. In fact, in one survey 70 percent of owners of declawed cats reported an improved relationship with their cat after the procedure.  

Myth #2:  A declawed cat cannot climb trees.

Declawed cats are not as effective at climbing trees as cats with claws, but declawing does not prevent tree climbing. That said, declawed cats should be kept indoors where they do not need claws to assist in self-defense. 

Myth #3:  A declawed cat cannot catch prey.

Declawed cats are not as effective at catching prey as cats with claws but declawing does not prevent effective hunting. 

Myth #4 A declawed cat has lost its ability to defend itself and should not be allowed outside.

This one is true. Without claws, a cat has indeed lost an important part of his defense system. Declawed cats should be housed indoors only. 

Myth #5:  Declawed cats are more likely to bite since they can no longer claw.

Declawed cats do not seem to realize they have no claws. They will continue to scratch ineffectively as if they did not know the difference. As for biting, there have been some studies that show an increased tendency to bite in declawed cats while other studies have not shown that. The trouble in interpreting this information is that one of the reasons cats are declawed is to control aggression. Cats that are aggressive, even in play, are more likely to be declawed to at least remove the claw portion of the human hazard. The same cat is still perfectly able to bite and will continue to bite. Studies on cats that bite after declaw have not explored whether the same cats were biting before the declaw so conclusions are difficult to draw.

Myth #6:  The post-operative period involves tremendous pain.

Pain management techniques have improved greatly in recent years and include regional nerve blocks eliminating pain completely from the feet during the first few days of healing, fentanyl pain relief patches, as well as injectable and oral medications. This means that a declawed cat should be comfortable in the recovery period. 

That said, if proper pain relief is not practiced, the declawed cat will have sore feet after surgery. The larger the cat, the more discomfort there is and reluctance to bear weight.  

The recovery period should not last longer than a week or so. Healing should be complete by two weeks. Pain after this recovery period is not normal or expected in any way and if a declawed cat seems to be uncomfortable or lame, a recheck appointment is definitely needed. 

If you plan to declaw your cat, you may want to ask your veterinarian about the pain relief plan they expect to utilize so you know what to expect. 

Myth #7:  A declawed cat will not use a litter box again.

It is important that litter not get impacted in the declaw incisions during the recovery period. Shredded paper is the usual recommendation during recovery and some cats simply will not use shredded paper. The recycled newspaper litters are an excellent alternative. The only litter problem one might expect would be lack of acceptance of a new litter during the recovery period. Declawed cats do not lose their litter box instinct.

Declaw Methods

Three techniques are commonly used for permanent declaw surgery: the Resco or clipper blade method; the disarticulation method; and the Laser declaw.

Resco/Clipper Blade Method

This is probably the most common method used by veterinarians to declaw cats as it is associated with the fastest surgery time. It involves the use of a sterile nail trimmer to cut through the bone of the third digit of the toe. The cat loses the part of the bone from which the claw grows. The incision is either sewn closed with suture material or closed in surgical glue.

What to Expect / Possible Complications

  • Patients commonly spend at least one night in the hospital for bandaging, monitoring for bleeding and pain assessment.
  • Some spotting of blood is normal from the toes during the first few days at home (beware if you have white carpeting).
  • Shredded paper or pelleted recycled newspaper litter is recommended during the healing period. Conventional clay or sand litters can impact inside the tiny incisions and cause infections.
  • Pain medication is essential, especially for larger or older cats who have more weight to carry on their tender healing toes. The amount of weight carried on the feet (the size of the cat) is the biggest factor in post-operative pain. There are numerous regimens employed for declaw pain control.
  • Occasionally not enough of the third bone is removed and the claw regrows. When this occurs, infection is generally inevitable and the remaining bone must be removed. This is not a potential complication when the disarticulation method is employed.
  • A study by Martell-Moran et al published in the Journal of Feline Medicine and Surgery in 2017 found that cats declawed with this method had more back pain later in life than disarticulated cats or undeclared cats.

Disarticulation Method

This procedure is a bit more difficult to master as it involves the delicate disconnection of all the tiny ligaments holding the third bone in place. The entire third bone is removed intact, whereas in the Resco method, the bone is cut through, leaving a small piece behind.

  1. Because the entire third bone is removed, there is a zero possibility of the claw growing back; however, the cut ligaments allow for a subtle drop in the way the foot is held. Most owners do not notice this change in posture.
  2. Two nights in the hospital are required for this procedure (one night with bandages and one without).
  3. Some spotting of blood from the toes is normal during the first few days at home (be aware of this with white carpeting).
  4. Shredded paper or pelleted recycled newspaper litter  is recommended for 10 days after surgery. Conventional clay or sand litters can impact the tiny incisions and cause infections.
  5. Pain medication is a good idea, especially for larger or older cats. The amount of weight carried on the feet (the size of the cat) is the biggest factor in post-operative pain. I recommend the use of the fentanyl patch for post-op pain control as well as pre-operative local blocks to the feet for pain control.
  6. Occasionally not enough of the third bone is removed and the claw regrows. When this occurs, infection is generally inevitable and the remaining bone must be removed.
  7. If the ungual crest of the nail is not removed (the area from which the claw grows), the claw may be able to partly grow back and a second surgery will be needed.

The Laser Declaw: Another Way to Disarticulate


Recently, the laser declaw has received a great deal of attention. In this surgery, a laser rather than a scalpel blade is used to disarticulate the third toe bone. Advantages of laser surgery include virtually no bleeding during surgery or afterwards, possibly less post-operative pain, and in many cases, no bandages.

The downside is the expense of the equipment. The cost of the laser equipment itself is $20,000 to $40,000. To justify such an expense, the laser must be able to generate substantial revenue for the hospital. This means that the cost of the laser declaw to the pet owner is likely to exceed the price of the conventional declaw by an additional $50 to $150 dollars.

Tendonectomy: A Surgical Alternative to Declawing

This surgical procedure has emerged as an alternative to the bone removing declaws. Here, a tendon is cut on the underside of each toe to prevent grasping motions. The claws remain but the cat cannot extend them.

What to Expect / Possible Complications

  • Because the incisions needed for this procedure are so small, the recovery is minimal. No bandages, no special litter, no blood spotting. There are usually no stitches to remove and the tiny incisions are closed in surgical glue.
  • Because the cat can no longer make grasping motions, the claws will naturally grow in a circular manner into the foot pads causing pain and infection unless the owner is able to trim the nails on a regular basis. The tendonectomy patient will require life-long regular nail-clipping. This may not be practical in an aggressive cat and may not be the right choice for an owner seeking a low-maintenance pet.
  • The August 1, 1998 issue of the Journal of the American Veterinary Medical Association reports a study to compare the long- and short-term complications of tendonectomy vs. those of traditional declaw. Owner satisfaction with both procedures was also measured. While cats who received the tendonectomy showed significantly lower pain scores immediately post operatively, both procedures showed an equal frequency of other complications (bleeding, lameness, and infection). The number of days it took for a cat to walk normally again was not different between the declawed cats and the tendonectomy cats. There was no significant difference between the percentage of owners satisfied with declaw versus the percentage of owners satisfied with tendonectomy. In a 2001 survey, more people were satisfied with the declaw over tendonectomy.
6772964

Desensitization and Counterconditioning to Nail Trimmers for Cats

How to help your cat get used to having their nails trimmed

  1. Start by putting the trimmers in a common area like your living room where your cat can choose to explore them at their pace. Putting treats around the nail trimmers can help to create more positive associations with them. If your cat will not go near the trimmers, feed them treats at a comfortable distance. Gradually decrease the distance between them and the nail trimmers.
  1. Next, have the nail trimmers nearby when you are interacting with your cat. This interaction may be a play session or a time when your cat is comfortably settled on your lap accepting treats. You do not need to move the nail trimmers around, just have them within view of your cat when they are near you.
  2. Let your cat see you lift and put down the nail trimmers. If your cat enjoys lying on your lap, you can have the nail trimmers near, pick them up and put them down, then feed your cat a treat.
  3. Practice bringing the nail trimmers to your cat’s foot, then moving them away and giving your cat a treat. If your cat is too stressed about this step, only bring the nail trimmers part way to your cat’s foot before putting them back down and giving a treat.
  4. After your cat has learned to tolerate a single nail being isolated and examined with the trimmers nearby, cut the toenail. Then begin adding toes to individual sessions until you can cut multiple toenails in one session.

Overall, you want your cat to feel as comfortable, safe, and relaxed as possible when getting their nails trimmed. Work with your veterinarian and staff to make nail trims at home and at the clinic the most positive experience possible for your cat.

6420816

Dietary Therapy for Hyperthyroidism in Cats

There always seems to be the occasional cat for which the traditional therapies do not seem to be appropriate.

  1. Radiotherapy is not an insignificant expense and may be financially out of reach. 
  2. Some cats simply will not take oral medications. 
  3. The compounded ear ointments do not always work. 
  4. Some owners are simply unable to give medications twice daily indefinitely with meaningful regularity. 
  5. Some cats have a concurrent illness that precludes methimazole or simply does not tolerate its side effects.

Iodine is an essential ingredient your cat needs to make thyroid hormone; therefore, it should not be surprising that the production of excessive amounts of thyroid hormone requires excessive amounts of iodine (in the case of hyperthyroidism). Since iodine comes from the diet, it turns out that it is possible to create a diet that is restricted enough in iodine to preclude the production of excessive amounts of the hormone yet not so restricted that an iodine deficiency results.

Hill’s Pet Nutrition has developed such a diet, called y/d, and it has been an alternative to the more traditional therapies since 2011. The diet is available in both dry and canned formulations in some regions. Always consult with your veterinarian before changing your pet’s therapeutic diet.

How Long do you Have to Feed the Diet for the Cat Not to be Hyperthyroid Anymore?

Several studies have been done, and hundreds of cats have been evaluated. Many cats will have normal thyroid levels in the first two months of diet use; however, a full response can take up to 12 weeks. By 12 weeks on the diet, 90% will show normal thyroid levels. The diet is ineffective in approximately 10% of cats eating it.

Can a Cat Have any Treats While on this Diet?

Unfortunately, there are no acceptable treats. Feeding ANY thing other than the therapeutic diet could interfere with the effectiveness of treatment. Foods or treats meant for other pets in the home should be kept away from a cat on this form of therapy. Also, hyperthyroid cats who roam outside may be eating any number of things out in the world. It is unlikely that their diet can be controlled enough for this form of therapy to be effective. In fact, if the cat on y/d is still hyperthyroid after eight weeks, it can be assumed that the cat is finding another iodine source. The cat might simply be cheating on the diet, getting extra iodine in medication or in drinking water, or even from the surface of a food bowl.

Can Other Cats in the Household Eat this Diet Safely?

After over a decade of Y/d diet availability, it appears that normal cats may safely eat Y/d diet. No reactions or problems were found when the diet was experimentally fed exclusively to normal cats for a two-year period. Further, no issues have come up in the pet-owning population. If multiple cats are present in the home and feeding separately is problematic, it should be fine to feed all the cats the iodine-restricted diet.

The manufacturer suggests taking a week to transition the cat from his normal food to this one, not because of the iodine issue but because it is always a good idea to avoid an abrupt food change. After the transition is complete, Hills recommends a thyroid level, kidney parameters, a recheck exam, and a urine specific gravity (test for urine concentration) after four weeks and again after eight weeks on a Y/d diet. If your cat is still not showing a normal thyroid level in eight weeks, it is worth going out to 12 weeks and evaluating one more time. After your cat has achieved a normal thyroid level, an exam, and blood work should be performed every six months.

In cats with concurrent kidney disease, lab work is recommended after two, four, and eight weeks on the diet and every three to four months thereafter.

What about Switching a Cat on Methimazole Over to the Diet?

The manufacturer recommends simply switching from medication to diet directly with no transitional period. Simply discontinue the medication and start the diet.

Methimazole, surgery, and radiotherapy are well-reviewed effective therapies for feline hyperthyroidism. Where this diet fits in the picture and whether it should replace traditional therapy or be considered an acceptable last resort remains to be seen over time.